How To: Modify Trusted Hosts to connect via Powershell

We have to connect to untrusted machines via PowerShell. To do this, you have to add the machines,

First, if you have settings in there run this command to get a backup:

$trustedhosts = get-Item -Path WSMan:\localhost\Client\TrustedHosts

Then to get them to modify:

$trustedhosts.value

copy that out, add your hosts to it with comma delimited and add it with powershell:

Set-Item WSMan:\localhost\Client\TrustedHosts -Value 'Server2,Server2'

To use it in code (so it doesn’t ask you if you’re sure), you can force it by using the -Force switch

Set-Item WSMan:\localhost\Client\TrustedHosts -Value 'Server2,Server2' -Force

then check again:

get-Item -Path WSMan:\localhost\Client\TrustedHosts

[Resolved] OnePlus 3 3T Screen Goes Blank or Locked when Dialing Someone

I had a problem last week where my phone started to lock the screen the moment I clicked on dial. It seemed that the proximity sensor on the OnePlus 3T was stuck and it assumed that I had the phone up to my face. I contacted OnePlus about this issue and their solution (As Always) was to reinstall the entire operating system. Basically wipe the phone.

Well, the simple fix is to toggle double tap!

So, to do this, go into your settings and find Gestures. In Gestures, turn off Double Tap. At this point, I rebooted my phone, made a phone call and verified that the problem was gone.

Then I turned on Double Tap again and made another call.

Problem resolved!

PowerShell How To: Find all users where account is inactive

I was recently asked asked to find all the users in Active Directory where their account was inactive.

There is a PowerShell commandlet called Search-ADAccount that you can use to find if the account is inactive by using the parameter -AccountInactive.

This is kind of crude but works well. I couldn’t figure out how to get the headers into the csv so I simply did a write-output for the first section.

#######################
# Ed Rockwell
# Free to use
# Version 1.0
# 8/7/2017
#######################
$time = 90 # Days since last login
$users = Search-ADAccount -AccountInactive -UsersOnly -TimeSpan $time # Get all users within that timeframe with AccountInactive Property greater than $time
$path = "C:\Powershell\AccountInactive" # Where to write file

#File Name
new-item $path\users.csv -Force

# Set the header of csv (Change this if you add to the write-output below)
write-output "$("SamAccountName"),$("Enabled"),$("PasswordExpired"),$("LastLogonDate"),$("OU Location")"  | add-content -path $path"\users.csv"

# Find users 
foreach ($user in $users) 
    {
        If ($user.DistinguishedName -notmatch 'OU=Disabled Users' -and $user.DistinguishedName -notmatch 'OU=Service Accounts' -and $user.DistinguishedName -notmatch 'CN=Microsoft Exchange System Objects')
            {
                $DN = $user.distinguishedname -split ',' 
                $container = $DN[1]
                write-output "$($user.SamAccountName),$($user.Enabled),$($user.PasswordExpired),$($user.LastLogonDate),$($container)" | add-content -path $path"\users.csv"
            }
    }

How to change the Friendly Name on a certificate -Windows

I ran into the situation where someone created and applied a certificate in IIS and the friendlyName was wrong. During automatic deployments of the software, they would call into the cert store and select the certificate to use for their 443 bindings based on the friendly name. The certificate was named wrong and wouldn’t get applied during deployment or it would apply the wrong one.

Here is how to fix this using PowerShell without re-issuing the certificate.

Open up PowerShell with administrative rights and change your location to the certificate store.

We will change the certificate with the thumbprint named wrong_internal_wildcard to right_internal_wildcard

PS C:\Users\ed> set-location cert:
PS Cert:\> cd .\\localmachine\My
PS Cert:\localmachine\My> Get-ChildItem


   PSParentPath: Microsoft.PowerShell.Security\Certificate::localmachine\My

Thumbprint                                Subject
----------                                -------
EC1D0A14FA9BAD91DA24B9F87ECBCDB63E9D6F6A
E09D1799FC7F5791797EC39ED75A90345D1EE080  CN=IssuingCA, DC=domain, DC=com
A0102DDEFE92D57E8136B150F1DAEC4DA628B2AD  CN=AnotherCA, DC=domain, DC=com
8F5A004D9F831A9EA18374C3367796F6075AA578  CN=*.domain.com, O=company, L=city, S=state, C=US

PS Cert:\localmachine\My> $cert = Get-ChildItem 8F5A004D9F831A9EA18374C3367796F6075AA578
PS Cert:\localmachine\My> $cert.FriendlyName
wrong_internal_wildcard

PS Cert:\localmachine\My> $cert.FriendlyName = "right_internal_wildcard"
PS Cert:\localmachine\My> $cert.FriendlyName
right_internal_wildcard

In the above example, I have done the following:

    1. Opened Powershell


    1. Set-Location to the certificate store by typing Set-Location cert:


    1. Listed out the certs by typing Get-ChildItem


    1. Located the cert I wanted to change the friendly name of


    1. Put that cert in a variable so I could view it’s properties


    1. Verified that the cert is the right one by typing $cert.friendlyname


    1. Then changed the friendlyname by typing $cert.FriendlyName = “right_internal_wildcard”


    lastly, I verifed the cert friendlyname by typing $cert.FriendlyName

Certificates – Convert pfx to PEM and remove the encryption password on private key

I’ve recently ran into a few times where we had to move a certificate from Microsoft Exchange to a HAProxy load balancer. I was provided an exported key pair that had an encrypted private key (Password Protected).

We will seperate a .pfx ssl certificate to an unencrypted .key file and a .cer file

The end state is to get the private key decrypted, the public cert and the certificate chain in the .pem file to make it work with openssl/HAProxy.

Requirements:
Openssl installed
.pfx file (you need to know the password)
intermediate public cert (you can obatin this from your provider like Thawte)
root public cert (you can obatin this from your provider like Thawte)

Step 1
Extract the private key from the .pfx file (you need to know the password:

openssl pkcs12 -in [certificate.pfx] -nocerts -out [certificate-key-encrypted.key]

Step 2
Now lets decrypt the key:

openssl rsa -in [certificate-key-encrypted.key] -out [certificate-key-decrypted.key]

Step 3
Now lets extract the public certificate:

openssl pkcs12 -in [certificate.pfx] -clcerts -nokeys -out [certificate.crt]

Step 4
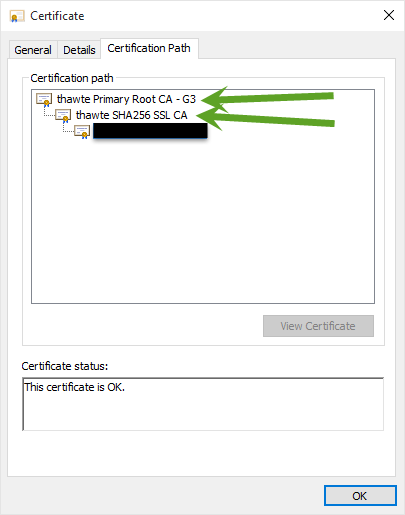
You also need all the public certs in the chain up to the root. I’m talking about these:
Root and Intermediate Certs

Step 5
now create a new text file (don’t use notepad) and put your public, private, intermediate public and root public together. It’s simple and should look like this:

-----BEGIN CERTIFICATE-----
### Replace with your public certificate ###
### From step 3 above ###
-----END CERTIFICATE-----
-----BEGIN CERTIFICATE-----
### replace with your intermediate public cert ###
-----END CERTIFICATE-----
-----BEGIN CERTIFICATE-----
### replace with your root public cert ###
-----END CERTIFICATE-----
-----BEGIN RSA PRIVATE KEY-----
### replace me with your .key file ###
### from step 2 above ###
-----END RSA PRIVATE KEY-----

Save the file as a .pem file.
If you want to view the cert on windows, simply rename the .pem to .cer

…This is how Ed does it πŸ™‚

Disable SSLv2, SSLv3 and Enable TLS 1.2 and pass Qualis SSL Test

I was tasked with securing one of our internet facing web servers against the POODLE SSL vulnerability and weaker old SSL technologies. After doing many searches online, I finally wrote a script to run against our Windows 2008 R2 server to disable the protocols in IIS via the registry. The following is a simple script that you can run to change the STUNNEL ciphers to make your server secure.

FIRST and most important, backup the registry hive that you will be changing. << You have been warned! Do this by going to the following hive and right clicking it and exporting the hive:

HKLM:\System\CurrentControlSet\Control\SecurityProviders\SCHANNEL\Protocols\

Then simply run this script and reboot your server:

##################################
#
# Author: Ed Rockwell
#
# This script modifys SSL to remove old ciphers and enables TLS 1.2 on Windows Server 2008 R2 and Windows 7
# To test and pass Qualys Scanning:
# https://www.ssllabs.com/ssltest/analyze.html?d=www.yourdomain.com &lt;&lt; Change this to whatever site you want to test
#

# Disables SSL 3.0 - Creates Keys - These keys do not exist so they need to be created prior to setting values.
md "HKLM:\System\CurrentControlSet\Control\SecurityProviders\SCHANNEL\Protocols\SSL 3.0"
md "HKLM:\System\CurrentControlSet\Control\SecurityProviders\SCHANNEL\Protocols\SSL 3.0\Server"
md "HKLM:\System\CurrentControlSet\Control\SecurityProviders\SCHANNEL\Protocols\SSL 3.0\Client"

# Disables SSL 3.0 - Creates DWords - for client and server SCHANNEL communications
New-ItemProperty -Path "HKLM:\System\CurrentControlSet\Control\SecurityProviders\SCHANNEL\Protocols\SSL 3.0\Server" -name "Enabled" -Value 0 -PropertyType "DWord"
New-ItemProperty -Path "HKLM:\System\CurrentControlSet\Control\SecurityProviders\SCHANNEL\Protocols\SSL 3.0\Server" -name "DisabledByDefault" -value 1 -PropertyType "DWord"
New-ItemProperty -Path "HKLM:\System\CurrentControlSet\Control\SecurityProviders\SCHANNEL\Protocols\SSL 3.0\Client" -name "Enabled" -Value 0 -PropertyType "DWord"
New-ItemProperty -Path "HKLM:\System\CurrentControlSet\Control\SecurityProviders\SCHANNEL\Protocols\SSL 3.0\Client" -name "DisabledByDefault" -value 1 -PropertyType "DWord"

# Disables SSL 2.0 - Creates Keys - These keys do not exist so they need to be created prior to setting values.
md "HKLM:\System\CurrentControlSet\Control\SecurityProviders\SCHANNEL\Protocols\SSL 2.0\Server"

# Disables SSL 2.0 for client and server SCHANNEL communications
New-ItemProperty -Path "HKLM:\System\CurrentControlSet\Control\SecurityProviders\SCHANNEL\Protocols\SSL 2.0\Server" -name "Enabled" -Value 0 -PropertyType "DWord"
New-ItemProperty -Path "HKLM:\System\CurrentControlSet\Control\SecurityProviders\SCHANNEL\Protocols\SSL 2.0\Server" -name "DisabledByDefault" -value 1 -PropertyType "DWord"
New-ItemProperty -Path "HKLM:\System\CurrentControlSet\Control\SecurityProviders\SCHANNEL\Protocols\SSL 2.0\Client" -name "Enabled" -Value 0 -PropertyType "DWord"
# This is by default already there - New-ItemProperty -Path "HKLM:\System\CurrentControlSet\Control\SecurityProviders\SCHANNEL\Protocols\SSL 2.0\Client" -name "DisabledByDefault" -value 1 -PropertyType "DWord"

# Enables TLS 1.2 on Windows Server 2008 R2 and Windows 7
# These keys do not exist so they need to be created prior to setting values.
md "HKLM:\SYSTEM\CurrentControlSet\Control\SecurityProviders\SCHANNEL\Protocols\TLS 1.2"
md "HKLM:\SYSTEM\CurrentControlSet\Control\SecurityProviders\SCHANNEL\Protocols\TLS 1.2\Server"
md "HKLM:\SYSTEM\CurrentControlSet\Control\SecurityProviders\SCHANNEL\Protocols\TLS 1.2\Client"

# Enables TLS 1.2 for client and server SCHANNEL communications
New-ItemProperty -path "HKLM:\SYSTEM\CurrentControlSet\Control\SecurityProviders\SCHANNEL\Protocols\TLS 1.2\Server" -name "Enabled" -value 1 -PropertyType "DWord"
New-ItemProperty -path "HKLM:\SYSTEM\CurrentControlSet\Control\SecurityProviders\SCHANNEL\Protocols\TLS 1.2\Server" -name "DisabledByDefault" -value 0 -PropertyType "DWord"
New-ItemProperty -path "HKLM:\SYSTEM\CurrentControlSet\Control\SecurityProviders\SCHANNEL\Protocols\TLS 1.2\Client" -name "Enabled" -value 1 -PropertyType "DWord"
New-ItemProperty -path "HKLM:\SYSTEM\CurrentControlSet\Control\SecurityProviders\SCHANNEL\Protocols\TLS 1.2\Client" -name "DisabledByDefault" -value 0 -PropertyType "DWord"

SSH with Powershell: Backup multiple Cisco devices

Today, I was asked to write a script to connect to all our Cisco devices and backup the configs to our fileserver. After a few hours of figuring it out, this is what I came up with

You ONLY need a READ ONLY account on the Cisco devices.

We run this every day at 2:00 AM and backup many Cisco devices.

I downloaded and use this SSH.NET Library: SSH With Powershell

You have to move it to your powershell modules directory and then import-module

##################################
# Ed Rockwell
# Requires SSH Module from here:
# http://www.powershelladmin.com/wiki/SSH_from_PowerShell_using_the_SSH.NET_library
# When downloading the above, you need to right click the download and unblock it in the properties
# Then add the contents to your powershell modules
# Free to distribute! Keep: http://www.EdRockwell.com
# 5/15/2014
 
Import-Module SSH-Sessions
 
$FileServerLocation = '\\path\to\file\server\'
$DeviceList = Get-Content '\\path\to\text\file\of\devices\NetworkDeviceList.txt'
$Date = (Get-Date -f yyyyMMdd)
 
md $Date
cd $Date
 
foreach ($Device in $DeviceList)
{
New-SSHSession -ComputerName $Device -Username YourCiscoUser -Password Password4CiscoUser
$DeviceBackup = Invoke-SshCommand -ComputerName $Device -Command 'show start'
$DeviceBackup | out-file $device'.txt'
}
 
cd ..
Move-Item $Date $FileServerLocation

Nexus 4 USB doesn’t connect to computer with Android 4.3 – Use Wireless FTP Transfer for Android

After I got my Nexus 5, I had the task of transferring all my pictures and music off of my Nexus 4 to my Nexus 5. I had thought that it would have been backed up and I could simply restore it on my Nexus 5. Well nothing came over. No Apps but my wireless connection settings did. That was a disappointment.

So, I decided to connect it to my computer to copy the data to it and then back down to the Nexus 5. That didn’t work!

My Nexus 4 for some reason couldn’t connect to ANY of my Windows 7 computers. I tried 3 different computers and at least 3 different USB cables. Nothing worked. It would charge when connected to the computer though…

Every once in a while, it would connect and I could copy some pictures and music over but then I would get a device error and the connection would get terminated. After 2 days of troubleshooting this problem I found a simple solution that works well.

I found a app in the Google Play store called “WiFi File Transfer Pro” which was free. This software turns your Android device into a FTP server on port 2121 and allowed me to use my favorite FTP program (FileZilla) to connect to it and copy ALL my pics and music off of my Nexus 4 over to my computer. Then I can connect my Nexus 5 to my computer (which does work by the way) and copy back to my shiny new Nexus 5 all my music and what pictures I want to transfer over.

The file transfer is still going as I have over 6GB of data to move off of the Nexus 4.

I did call Google Nexus Support at 1-855-836-3987 and got a US speaking support person that did help me but he didn’t have a working solution except to try one of these programs.

Once I get everything off my old Nexus 4, I’m going to wipe the phone to factory defaults and see if it works again after the wipe. If not, Back to Google for Warranty repair πŸ™

This phone will then be handed down to my wife and her’ Google Galaxy Nexus will go to my mom! EEEK!!!


Nexus 5 – What I like and HATE about the Nexus 5 (First 24 hours)

I received my Nexus 5 yesterday and fired it up. A few notes that I didn’t like about my first 24 hour experience…

Nexus 5 Dislikes come first because they bug me the most:

Icons got larger… Much Larger

The icons in the app list got larger and lost a row. My Nexus 4 had 5×5 grid of application icons. The Nexus 5 has a 4×5 grid and the icons got bigger. This drives me nuts. It took me a few hours to figure out why it was bugging me until I had the phones side by side. They are simply bigger. I think now that the phone has a higher resolution, they should have kept the icons the same size (in pixels) and let them be smaller or let us change the size of the icons back. I feel that I’ve lost some real-estate since there isn’t as many icons even though the screen got larger with higher resolution.

Nexus 5 - 4 icons wide

Nexus 5 – 4 icons wide

Nexus 4 - 5 icons wide

Nexus 4 – 5 icons wide

The Camera sticks out the back

This is a crazy decision. Why would you let a phone teeter totterΒ on the camera lens when it is set down. This keeps the phone from having a good grip (using the rubber back) on anything you set it on. Everyone that stopped by my desk to see the phone immediately noticed this. Just a bad design decision.

They switched/rotated the USB connection port 180 degrees

Why would they do this? now my docking station for my Nexus 4 doesn’t fit the Nexus 5. It would have fit fine if they wouldn’t have done this. Also, now I have to remember to flip my plug around when plugging it in when the light is dim. This sucks. If Google would have thought of keeping the Nexus line similar in versions, they sure missed the boat on this one. Just pisses me off!

The back has a HUGE label on it

Such a pretty phone. Nice and black. No Silver or chrome at all on it. Just what I wanted. Then, they slapped a IMEI sticker across the back. I assume I need this so I had better not remove it but why? Why not put it in the slot where you put the SIM card? Oh, why am I not a designer!

No color in the status window shade

Huh? so before, when you were disconnected from Google, your signal strength would change from blue to white. You would not receive any updates, notifications or anything on Android 4.3. To fix this, I had to open up Google Hangouts and it would re-register and turn blue again. Now, there is no way to tell if you’re disconnected from Google. It’s a shame! The blue looked nice. Now it’s just white. If I had a white background, what would it look like now…

Google Hangouts for SMS/Texting

What? Now I gotta figure this out? I guess it’s a move to get your texts and messages out of the providers SMS/Texting service and on to Google’s? I’ll bet that’s the plan. Then start sending ad’s may come next. Shit, this is hard to figure out. Why?

Swipe left for Google Now…

Where did my left desktop go on my phone. Now I have Google Now there. That sucks! I don’t want it there and can’t figure out how to change it.

And now on to the things I like

The Sound is much better on the Nexus 5

Wow! the sound has gotten much better. I have owned all the Google phones starting with the Google G1, then the Galaxy Nexus (Curved phone) which the volume and ringer SUCKED, the Nexus 4 which got better but not great and now the Nexus 5. I think Google and LG finally got it right. Maybe it takes a TON of customers to complain over and over until they listen. You will be satisfied with this!

An ALL BLACK phone. No silver/chrome accents

Oh, My, this Nexus 5 looks fine! eNuff said!

Full Screen background

Yah, this was a long time coming. The full background and allowing apps to use the full screen makes use of the full screen. Much nicer. Thanks Google!

Ok Google…

This is just awesome so far. I wish I could command my phone while it was locked but that’s ok for now. Saying “Ok Google, Call my wife” works great. LOVE IT. I wish it dialed a default number which I think it can so I don’t have to interact with it while driving doing something else πŸ™‚

Conclusion

Ok. I’m done bitching about the phone. Overall, I’m starting to like it even though there are some things that simply suck. Yup, some changes were just not a good decision.

About ME: Long time Google Android User. Always use Google Chrome. I’m allergic to IE! Makes me sick! 20+ years in IT as a Systems Administrator supporting all aspects of IT. I LOVE Android phones and Google products.

How To: Import AD Users from .csv file

I had a project that required me to make over 40 domain accounts. I decided that it was time to create all the domain accounts with a Powershell script. The script I came up with uses an import csv file with all the accounts and info I needed in it. Make sure you take the time to plan a naming convention for your AD accounts. In this case, they were a type of service account for many different environments. To keep it quick, I decided to not auto-gen the passwords so I simply put them in the csv file and removed them when I was done. Well, it took me a day or so to figure out my script to create ad accounts because I had problems…

My troubleshooting was a bit flawed but I didn’t know it until the very end (After running for all the users). I was having problems with the script ending in error . This is a very generic error. I knew that my accounts had spaces in them for $GivenName $Surname and $Name. So, I went through the trouble making sure that my variable properties with spaces had “” around them. Yes, that’s a pair of double quotes. My Display name I wanted to use had GivenName and Surname in it with a space. So it looks like this: Displayname = ($User.”GivenName”+” “+$User.”Surname”). The quotes around “GivenName” allowed me to use two names in the GivenName column of the .csv file and the same for “Surname”. This way I can create an account that looks like: First Second Third Forth. In other words, my “GivenName” in my CSV was First Second so I had to put “” around it in the script so it would read it as one word. What I missed is after everything was put together, the fields were over 20 characters. Well, the limit on Windows 2008 Account “Names” is 20 characters. Until I ran my script and found that it didn’t create about 1/2 of them, I started analyzing the .csv file to figure out why it didn’t work. I found out that the ones that didn’t get created are the ones that were over 20 characters.

Here is the script. You will notice that I’ve got a comment in the script for the .csv file’s header fields. You can add to them or remove as needed. I think it’s easier to view the powershell references on Microsoft’s site. Here is the link to Set-ADUser cmdlet: http://technet.microsoft.com/en-us/library/ee617215.aspx. For each property, you need it in the script and in the .csv file. If there are special characters or spaces. Remember to use the “” around it in the script. Also, make sure you are not exceeding the field length in AD for each property. The sAMAccountName (pre-Windows 2000 logon name) is limited to 20 characters for user objects. This is what got me a few times πŸ™

Let me know if you need anything below explained! I’ll answer all comments on this the same day if I can.

# REQUIRE DA ACCOUNT  
if (! ($ENV:USERNAME).ToUpper().EndsWith("ADM"))
{
	throw "SCRIPT MUST BE RUN WITH ADMIN ACCOUNT"
}
 
# IMPORTING AD MODULE
if (! @(get-module -name ActiveDirectory).count) 
{
	import-module ActiveDirectory
}
 
# GETTING USERS FROM CSV FILE
 
### NOTE: The Account Column CAN NOT be more than 20 characters or it will fail on them!
 
$Users = Import-CSV C:\CreateADUsers.csv 
# columns are: GivenName,Surname,Name,Account,Password,Department,Description
 
 
# CREATING USERS
# If you don't have two word attributes, you can remove some of the "" below after the $User.
foreach($User in $Users)
{
	$Params = @{
		SamAccountName = $User.Account
		Name = $User."Name"
		GivenName = $User."GivenName"
		Surname = $User."Surname"
		Displayname = ($User."GivenName"+" "+$User."Surname")
		UserPrincipalName = ($User.Account+"@domain.com")
		Department = $User."Department"
		Description = $User."Description"
		Path = "OU=Your OU,DC=domain,DC=com"
		PasswordNeverExpires = $true
		AccountPassword = (ConvertTo-SecureString $User.Password -AsPlainText -Force)
		Enabled = $true
	}
	new-ADUser @Params
}

I’m a seasoned Systems Administrator with experience starting in the early 90’s when 286 computers with 20 and 30 Mhz processors running Windows 3.1 which was the newest operating system.

…and that’s the way Ed does it πŸ™‚ — Thanks Scott J. for that πŸ™‚